Fitted the rear wheel today along with the front bars, controls, Clocks and headlight shell.
Showing posts with label 350 F2 Frame. Show all posts
Wednesday, 29 July 2020
Thursday, 28 May 2020
Locks
While the frame is away at the welders I decided to do a small job and investigate the seat and fuel tank locks. The helmet seat lock doesnt have a key and is busted, Im not sure if I bother getting a replacement, the seat latch on both sides work which is good enough for now.
And also the tank lock is fully operational but needs a tidy, I might consider a pattern replacement.
Labels:
350 F2 Frame,
F2 Frame,
F2 Fuel Tank,
Locks
Tuesday, 17 March 2020
Carb Clean
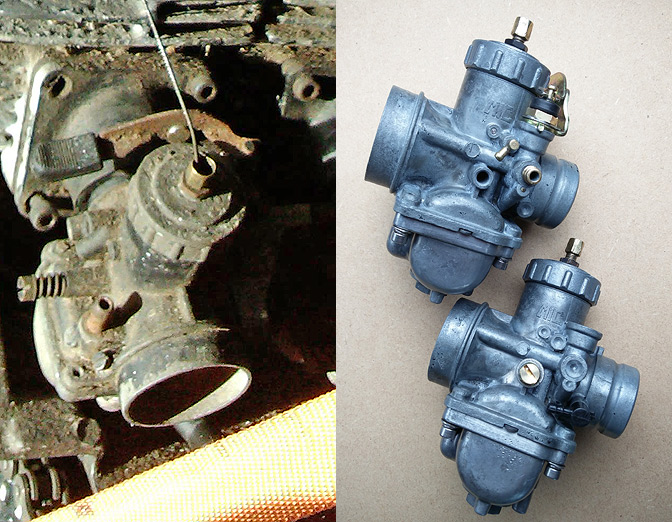
I invested recently in an ultrasonic cleaner and proper solution to clean the grubby carbs.
I had previously purchased new parts from Yambits to complete the rebuild, New jets,
needles, choke, seals and screws.
So after a good going over with a dremil and stainless steel brush I removed the old paint
and oxidisation and then gave them a good cleaning in the UC.
Next up I need to make a list of what parts I need to complete the job and what tasks I need
to do on the bike to finish.
I had previously purchased new parts from Yambits to complete the rebuild, New jets,
needles, choke, seals and screws.
So after a good going over with a dremil and stainless steel brush I removed the old paint
and oxidisation and then gave them a good cleaning in the UC.
Next up I need to make a list of what parts I need to complete the job and what tasks I need
to do on the bike to finish.
Labels:
2 Stroke,
350 F2 Frame,
Carburettor,
RD250,
Ultrasonic Clean,
Yamaha RD-250
Tuesday, 21 July 2015
Electrics
Started into the fitting of the electrics.
Front end is now complete and the loom
is loosely fitted.
I need to fit the plastic under trays to the
rear frame to determine where the regulator
rectifier etc are to be placed.
I was going to use the rear standard
mud guard, but its getting the chop and will
use an alternative.
Front end is now complete and the loom
is loosely fitted.
I need to fit the plastic under trays to the
rear frame to determine where the regulator
rectifier etc are to be placed.
I was going to use the rear standard
mud guard, but its getting the chop and will
use an alternative.
Labels:
350 F2 Frame,
Electrics
Sunday, 29 March 2015
Yokes Finished
Got the top and bottom yokes finished.
Drag bars fitted to the top yoke with alloy risers
and stops fitted to the bottom yoke.
Drag bars fitted to the top yoke with alloy risers
and stops fitted to the bottom yoke.
Labels:
350 F2 Frame,
Aprilia Yokes,
steering stops
Friday, 27 March 2015
Modifying the Yoke
Started with the front end: the bars and stops.
I measured the bottom yoke for the stops.
Trying to locate them to avoid the webs
underneath and achieve a good angle.
I measured the bottom yoke for the stops.
Trying to locate them to avoid the webs
underneath and achieve a good angle.
Labels:
350 F2 Frame,
Aprilia Yokes,
bottom yoke,
steering stops
Wednesday, 25 March 2015
Side Stand Sorted
Modified side stand to relocate the original spring and
Shortened the kick tab, both the tab and the foot do not
interfere with the gear change lever.
Shortened the kick tab, both the tab and the foot do not
interfere with the gear change lever.
Labels:
350 F2 Frame,
Side Stand
Tuesday, 24 March 2015
Left Pipe Extended
I took the plunge and cut the end can off the
left hand exhaust. This enabled me to mount
the main body of the exhaust to the engine/frame
to check the side stand clearance and spring
location.
The end can will have to be extended by a minimum
of 125mm to clear the swingarm. The image below
shows it extended fully by about 200mm. This also
places it wider than before.
left hand exhaust. This enabled me to mount
the main body of the exhaust to the engine/frame
to check the side stand clearance and spring
location.
The end can will have to be extended by a minimum
of 125mm to clear the swingarm. The image below
shows it extended fully by about 200mm. This also
places it wider than before.
Labels:
350 F2 Frame,
Codnor Micron,
Exhaust
Friday, 13 March 2015
Exhaust Run
temporarily fitted the pipes to check clearances
here is how it should look . . .
because the exhaust ports are angled inwwards
it looks like the cans will clear the swingarm.
here is how it should look . . .
because the exhaust ports are angled inwwards
it looks like the cans will clear the swingarm.
Labels:
350 F2 Frame,
Codnor Micron,
Engine,
Exhaust,
RD250
Gear Change
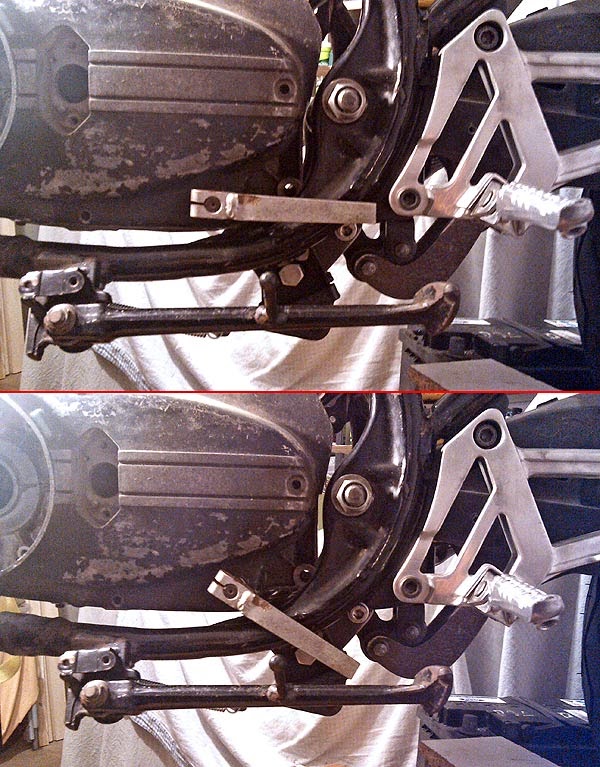
More side stand ponderings
there will have to be a few tweaks to the side stand.
it turns out the point where the spring is held
on the stand hits the exhaust along with the spring.
I know I have the original spring in the garage
somewhere, i put it somewhere safe, as usual too safe.
this would be a better fit as the spring part of it does
not run the full length link the temporary one in the image.
the gearchange is ok but the kick peg on the side
will have to be moved.
there will have to be a few tweaks to the side stand.
it turns out the point where the spring is held
on the stand hits the exhaust along with the spring.
I know I have the original spring in the garage
somewhere, i put it somewhere safe, as usual too safe.
this would be a better fit as the spring part of it does
not run the full length link the temporary one in the image.
the gearchange is ok but the kick peg on the side
will have to be moved.
Labels:
350 F2 Frame,
Exhaust,
Side Stand
Wednesday, 11 March 2015
Freestanding
no need for belts or straps . . .
managed to fit a side stand last night. I had one
from a Honda CBR-600 "in stock" which just
bolts on after a slight modification to the outer
diameter of the mounting surface where a sensor
fits on the CBR stand.
I need to check that the gear linkage and footrest
clear the folded stand . . . looks a bit close . . .
managed to fit a side stand last night. I had one
from a Honda CBR-600 "in stock" which just
bolts on after a slight modification to the outer
diameter of the mounting surface where a sensor
fits on the CBR stand.
I need to check that the gear linkage and footrest
clear the folded stand . . . looks a bit close . . .
Labels:
350 F2 Frame,
Side Stand
Tuesday, 10 March 2015
Rear Engine Mount
I decided to use the existing rear engine mounts
on the F2 frame but while the engine mount
lines up perfectly with the existing frame mount
on the left hand side the bolt holes do not line up.
A few 5mm thick steel mounts were fabricated and
welded with an aluminium spacer to fix the engine
to the frame. I just need to get a "Half Nut" and a
correct length bolt to finish the job.
on the F2 frame but while the engine mount
lines up perfectly with the existing frame mount
on the left hand side the bolt holes do not line up.
A few 5mm thick steel mounts were fabricated and
welded with an aluminium spacer to fix the engine
to the frame. I just need to get a "Half Nut" and a
correct length bolt to finish the job.
Labels:
350 F2 Frame,
Engine mounts,
RD250
Monday, 2 March 2015
Sunday, 1 March 2015
Engine Frame Clearance
In order for the engine to clear the frame in all areas
it had to be lifted at the rear by approximately 7mm.
Next up is to make some top rear mounts brackets using the existing
mounting points.
it had to be lifted at the rear by approximately 7mm.
Next up is to make some top rear mounts brackets using the existing
mounting points.
Labels:
350 F2 Frame,
Engine mounts
Engine Mounts final
Front engine mounts welded into place and primer
coated to combat the surface rust building up in my garage.
So engine in and lined up. I had concerns about the swingarm
angle and the relation between the final drive and the swingarm
pivot point. The engine has ended up a little lower than desired
this will have to be a compromise.
The swingarm angle is set approximately at 12.5 degrees which
I read somewhere that it was a desirable number.
coated to combat the surface rust building up in my garage.
So engine in and lined up. I had concerns about the swingarm
angle and the relation between the final drive and the swingarm
pivot point. The engine has ended up a little lower than desired
this will have to be a compromise.
The swingarm angle is set approximately at 12.5 degrees which
I read somewhere that it was a desirable number.
Tuesday, 24 February 2015
Engine Mounts
Next up is to get some new engine mounts welded
onto the frame. The earlier aircooled front engine
mounts are positioned the same as the later LC
ones but are the full width of the cases so the
existing mounts on the frame will have to be removed.
I plan to use 2 sets of mounts either side, an inner
and outer mount. The engine will bolt onto the inner
mount and that will in turn bolt to the outer mount
welded to the frame.
Mock up of the 3 engine mounting points to be used initially.
Mock up of Inner and outer mounts
onto the frame. The earlier aircooled front engine
mounts are positioned the same as the later LC
ones but are the full width of the cases so the
existing mounts on the frame will have to be removed.
I plan to use 2 sets of mounts either side, an inner
and outer mount. The engine will bolt onto the inner
mount and that will in turn bolt to the outer mount
welded to the frame.
Mock up of the 3 engine mounting points to be used initially.
Mock up of Inner and outer mounts
Labels:
350 F2 Frame,
Engine mounts,
RD250,
Yamaha RD-250
Monday, 16 February 2015
Spaced out Hanger
In order for the swingarm to clear the left side footrest/hanger
i placed tapered spacers behind the hanger mounting points.
Another issue waiting for me is the clearance between the
swingarm and the expansion chamber on the left hand side.
i'll worry about that later.
Next up is breaking the engine . . .
i placed tapered spacers behind the hanger mounting points.
Another issue waiting for me is the clearance between the
swingarm and the expansion chamber on the left hand side.
i'll worry about that later.
Next up is breaking the engine . . .
Labels:
350 F2 Frame,
Footrest,
Hangers,
Yamaha YZF-R125 Swingarm
Dog Bones
Measuring, Fabricating and Fitting of the
new links to connect Frame, Shock and
Swingarm. The links from the shock to
the frame are temporary until the engine
is fitted.
NEW LINKS ON THE LEFT,
ORIGINAL yzf-r125 ON THE RIGHT
new links to connect Frame, Shock and
Swingarm. The links from the shock to
the frame are temporary until the engine
is fitted.
NEW LINKS ON THE LEFT,
ORIGINAL yzf-r125 ON THE RIGHT
Labels:
350 F2 Frame,
Rear Shock,
Yamaha YZF-R125 Swingarm
Subscribe to:
Posts (Atom)