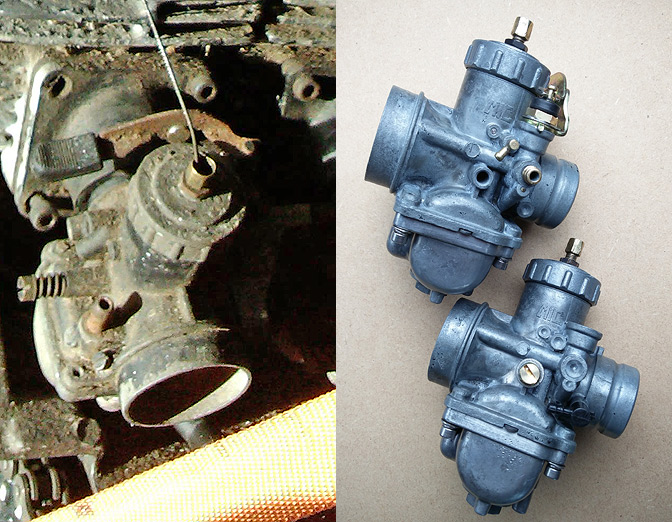
I invested recently in an ultrasonic cleaner and proper solution to clean the grubby carbs.
I had previously purchased new parts from Yambits to complete the rebuild, New jets,
needles, choke, seals and screws.
So after a good going over with a dremil and stainless steel brush I removed the old paint
and oxidisation and then gave them a good cleaning in the UC.
Next up I need to make a list of what parts I need to complete the job and what tasks I need
to do on the bike to finish.
Showing posts with label Yamaha RD-250. Show all posts
Tuesday, 17 March 2020
Friday, 1 May 2015
Switches
Over the last couple of weeks i have been working
mostly in the garden with a bit here and there in the
garage working on the front end of the project.
Both RD250 original handlebar switches have been
stripped cleaned, sprayed and assembled with stainless
screws/bolts and the wires re-covered with fresh heat shrink.
A bracket has been fabricated from 3mm aluminium bar
and fixed to the brake lever assembly.
I have also sprayed the clock backs and bracket along with
the headlight brackets, more on that to follow later.
mostly in the garden with a bit here and there in the
garage working on the front end of the project.
Both RD250 original handlebar switches have been
stripped cleaned, sprayed and assembled with stainless
screws/bolts and the wires re-covered with fresh heat shrink.
A bracket has been fabricated from 3mm aluminium bar
and fixed to the brake lever assembly.
I have also sprayed the clock backs and bracket along with
the headlight brackets, more on that to follow later.
Labels:
2 Stroke,
Front Brake Reservoir,
RD250,
Switches,
Yamaha RD-250
Monday, 2 March 2015
Tuesday, 24 February 2015
Engine Mounts
Next up is to get some new engine mounts welded
onto the frame. The earlier aircooled front engine
mounts are positioned the same as the later LC
ones but are the full width of the cases so the
existing mounts on the frame will have to be removed.
I plan to use 2 sets of mounts either side, an inner
and outer mount. The engine will bolt onto the inner
mount and that will in turn bolt to the outer mount
welded to the frame.
Mock up of the 3 engine mounting points to be used initially.
Mock up of Inner and outer mounts
onto the frame. The earlier aircooled front engine
mounts are positioned the same as the later LC
ones but are the full width of the cases so the
existing mounts on the frame will have to be removed.
I plan to use 2 sets of mounts either side, an inner
and outer mount. The engine will bolt onto the inner
mount and that will in turn bolt to the outer mount
welded to the frame.
Mock up of the 3 engine mounting points to be used initially.
Mock up of Inner and outer mounts
Labels:
350 F2 Frame,
Engine mounts,
RD250,
Yamaha RD-250
Tuesday, 17 February 2015
Split Cases
I have had this engine for about 4 years
and its finally stripped. I think the crank
needs re-building ! . . . and the cases really
need to be cleaned.
and its finally stripped. I think the crank
needs re-building ! . . . and the cases really
need to be cleaned.
Labels:
2 Stroke,
Crank Shaft,
Engine,
RD250,
Yamaha RD-250
Sunday, 25 August 2013
Rear Brake setup
This is probably going to be one of the greatest challenges with this project, setting up the rear brake system. I sourced a setup from a 2000 Yamaha R6 in good condition. The caliper pistons were close to being seized, the master cylinder and hoses etc are in good condition.
Wednesday, 15 May 2013
blow out
next step was to apply heat to the damaged areas with the aid of 2 butane/propane blow torches to soften them metal for the internal air pressure to push out the dented areas.
I got the first pipe fairly well sorted with a few of the deeper scores still visible, The second pipe was more of a challenge as the damage was greater . . . and I ran out of gas!
Labels:
2 Stroke,
Codnor Micron,
Exhaust,
Yamaha Engine,
Yamaha RD-250
pumped
Next step was to plug both ends of each pipe after removing the baffles pressurized with air from a foot pump.
I used 5mm steel plate and an old bicycle tube as a seal with various brackets and clamps. I was able to get the pressure up to 80psi.
Labels:
2 Stroke,
Codnor Micron,
Exhaust,
Yamaha Engine,
Yamaha RD-250
compressed expansions
A major concern for me was the whole topic of the expansion chambers, firstly sourcing a set and secondly fitting them with the non native frame present.
I managed to source a set from a forum member on RDnuts . they are a pair of early Microns under the name "Codnor Micron" with short can silencers. They have been involved in a meeting with a foreign object at the diffuser point and need to be repaired.
Labels:
2 Stroke,
Codnor Micron,
Exhaust,
Yamaha Engine,
Yamaha RD-250
Subscribe to:
Posts (Atom)


